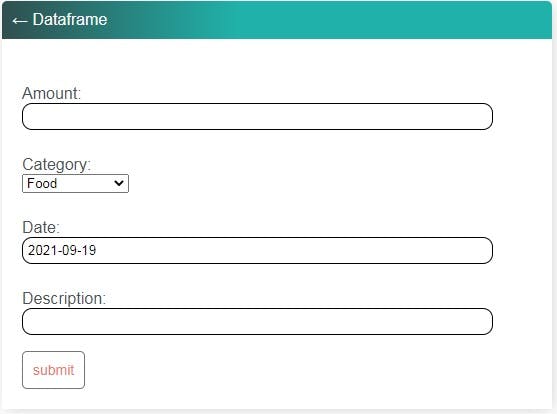
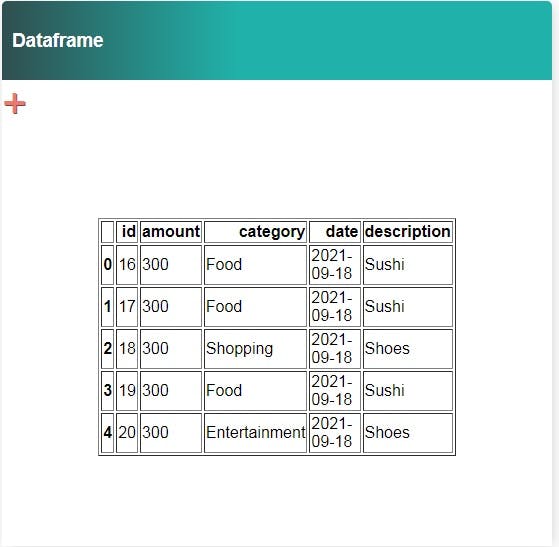
In this python project, we will need to install Django and Pandas library, and we will make a form with four fields: Amount of money, category(Food, Travel, Shopping...), date, and description. And that information will be shown in a pandas dataframe.
The first thing we need to do is install Django and pandas library:
     pip install django

     pip install pandas
After Django and pandas are installed in your environment, it's the moment to start the project.
Django-admin startproject expenses_tracker
When the project's directory is created, you have to move to "expenses_tracker", and write this code in your terminal:
py manage.py startapp tracker
Now you have to go to "settings.py" and scroll down until you see "INSTALLED_APPS" and write 'tracker', like this:
  INSTALLED_APPS = [
'django.contrib.admin',
'django.contrib.auth',
'django.contrib.contenttypes',
'django.contrib.sessions',
'django.contrib.messages',
'django.contrib.staticfiles',
'tracker',
   ]
Then write this code in the terminal:
 py manage.py makemigrations
 py manage.py migrate
 py manage.py runserver
     from django.db import models
     from django.utils.timezone import now

     # Create your models here.
     CATEGORY_CHOICES = [
                ("Food","Food"),
                ("Travel","Travel"),
                ("Shopping","Shopping"),
                ("Necessities","Necessities"),
                ("Entertainment","Entertainment"),
                ("Other","Other")]

   class Expense_data(models.Model):
            amount=models.CharField(max_length=10)
            category=models.CharField(max_length=20,choices=CATEGORY_CHOICES,default='Food')
            date=models.DateField(default=now)
            description=models.CharField(max_length=200, blank=True)

             def __str__(self):
                   return self.category
In models.py, the database is created, just one table, named "Expense_data" with four fields, the fields that are needed to fill in the form, CATEGORY_CHOICES is a constant list with choices that are shown in the category field.
   from django import forms
   from django.forms import ModelForm

  from .models import *

 class ExpenseForm(forms.ModelForm):
          amount = models.CharField(max_length=10)
          category = models.CharField(max_length=20, choices=CATEGORY_CHOICES, default='Food')
          date = models.DateField(default=now)
          description = models.CharField(max_length=200, blank=True)

          class Meta:
                  model=Expense_data
                  fields='__all__'
We need to create a new file with the name "form.py" inside the expenses_app directory and import the models and the forms from django modules. In this file, we create a class with the name "ExpenseForm" and we copy-paste the information from our models.
 from django.shortcuts import render, redirect
 from .models import Expense_data
 from .forms import *
 import pandas as pd


  def expenses_form(request):
        expenses=Expense_data.objects.all()
        form=ExpenseForm()

         if request.method == 'POST':
               form = ExpenseForm(request.POST)
               if form.is_valid():
                    form.save()
               return redirect("expenses-dataframe")
         context={'expenses': expenses, 'form':form}
         return render(request,'tracker/tracker_form.html',context)


  def expenses_dataframe(request):
        data=Expense_data.objects.all().values()
        df=pd.DataFrame(data)
        context={'df':df.to_html()}
        return render(request, 'tracker/tracker_data.html', context)
In views.py we create a function to handle the POST request. The variable "expenses" is assigned all the objects of the models, and in the variable "form" the form. The code below does, if a POST is requested from our form, and is valid, it is saved, and we are redirected to the "expenses-dataframe" page, to the context variable is assigned all the objects from the models and the form, to be rendered in the "tracker_form.html".
In the "def expenses_dataframe", we take all the models from our database and assign them to the variable "data". The "df" variable has assigned the dataframe the model's objects that will be shown. Then we assign the dataframe to a context that transforms it into an HTML object, the last code renders it to the HTML file.
In the project's directory(expenses_tracker), there is a urls.py, we copy the next code:
 from django.contrib import admin
 from django.urls import path,include

 urlpatterns = [
      path('',include('tracker.urls')),
      path('admin/', admin.site.urls),
      ]
After that, we create a urls.py file but inside the app's directory(tracker), with next code:
   from django.contrib import admin
   from django.urls import path
   from .views import *
   from . import views

   urlpatterns = [
        path('',views.expenses_form,name='expense-tracker'),
        path('/dataframe', views.expenses_dataframe, name='expenses-dataframe'),


         ]
from django.contrib import admin
from .models import Expense_data

 # Register your models here.
 admin.site.register(Expense_data)
In admin.py we register our model into the admin account.
We need to execute the code to migrate our model.
py manage.py makemigrations
py manage.py migrate
py manage.py createsuperuser
You have to create a username and password to have access to the admin account.
We need to create a template directory folder inside the app folder named "templates": inside the templates folder, we create another folder named "tracker"; inside it, we put all our HTML files.
tracker_form.html
{% extends 'tracker/base.html' %}
{% block content %}
<div class="header-bar">
<a href="{% url 'expenses-dataframe' %}">← Dataframe</a>
</div>
<div class="card-body">
<form method= "POST" action ="">
{% csrf_token %}
{{form.as_p}}
<input class="button" type="submit" value="submit">
</form>
</div>
{% endblock content %}
tracker_data.html
{% extends 'tracker/base.html' %}
{% block content %}
<div class="header-bar">
<h3>Dataframe</h3>
</div>
<div id="expenses-add-wrapper">
<a id="add-link" href="{% url 'expense-tracker' %}">+</a>
</div>
<body>
<div class="table">{{df|safe}}</div>
</body>
{% endblock content %}
Here is the base.html file.


Thank you for reading this article. If you have any questions or feedback, please let me know in the comments section or through my Twitter account.
